Showing posts with label fashion trend. Show all posts
Showing posts with label fashion trend. Show all posts
DINAGYANG'S FASHION EXHIBIT
These are just a couple of the fashion exhibits that can be found at Sm City Iloilo. You can see here that various Ilonggo designers are featured to showcase their talents and be proud of Ilonggo products. Here are some
This shoe was designed by Ms. Nicole Calzado who had been in the fashion industry for a year and a half now. (Among her other designs, this was my favorite.)
DIY: TSHIRT CUFF
Being a fashionista doesn't mean over accessorizing or buying all the latest trends in the market. You can still be one, if you know how to use your resources. Just like what I did with my old shirts which I turned to tshirt yarn into tshirt cuff. This was really a great idea especially if you have old tshirts stocked at your closet. Now, I'm gonna show you how...
(the brown and pink cuff is another style)
Materials:
Tshirt yarn
Scissors
1. Prepare 6 tshirt yarn. (to know how to make a tshirt yarn TSHIRT YARN) Color depends on you. (mine is, 2 pinks, 4 violet) You should make a knot first and taped it to a table.
2. Make a knot with the left yarn in first then the right yarn.
3. After the left yarn goes in, let the right yarn followed.
4. Let the right yarn goes inside the left yarn.
5. Tighten the knot.
6. This should how it look. Repeat steps 2-6 until it reach the end.
7. Place it in your arm and make a knot to the first top knot you made. Then trim excess yarn.
8. Voila your done! :)
Always remember...Be Positive & Be Creative! :)
DIY: TSHIRT SHOELACE
I was never thinking I could use the tshirt yarn as a shoelace, not until I took a glimpse on my shoes. I immediately got the idea and decided to replace my old shoelace. It matched perfectly and it looks great on it.
Always remember...Be Positive & Be Creative! :)
DIY: CUT OUT SHOULDER
Cut Out Shoulder are very trendy in the fashion scene. It shows that every woman could be fashionable in the clothes they wear and not by over accessorizing. Thus, I wanted to show you how I made my own Cut Out Shoulder. Here it is...
Materials:
Tshirt
Scissors
Needle
Thread
2. Lay it flat and make a curve mark starting from the shoulders to the sleeve. Then cut it.
3. Fold the shirt lengthwise and trace the cutted right sleeve to the left sleeve and cut.
Just like what I did with my DIY: RACERBACK WORKOUT SHIRT
5. Fold a few centimeters of the sleeve (from the shoulder to the arm) inwards and sew. Do the same with the other side.
6. Fold also a few inches of the sleeve (at the arm portion) inwards, depends on how big is your arm and sew.
7. Tada! your done :)
Now, you can enjoy your own Cut Out Shoulder and can brag to your friends.
Always remember...Be Positive & Be Creative! :)
DIY: SHORTS MAKEOVER
Do you have an amazing way of designing your favorite shorts? If you have then it's great but if you don't have, I'll show you how.
Materials:
Shorts
Cloth or Shirt (with design you want)
Scissors
Needle
Thread
1. Look for a cloth or old shirt with a good design. Measure and cut a large square just enough to cover the one side of the jeans.
2. Place the finished cloth or shirt on top of the jeans where you want to sew it.
3. Fold the edge of the cloth a little before you sew it to give a clean look.
4. Align the cloth and start sewing. Make sure to sew all sides to secure it in place.
Always remember....Be positive & Be creative! :)
DIY: TSHIRT NECKLACE
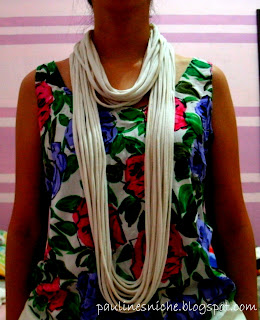
If you like wearing unique pieces and has tons of old shirts, then a tshirt necklace is perfect for you. Having great pieces like these shows your hippie side. It is also best use during Christmas season where the weather is a bit cold.
Materials:
Old tshirt
Scissors
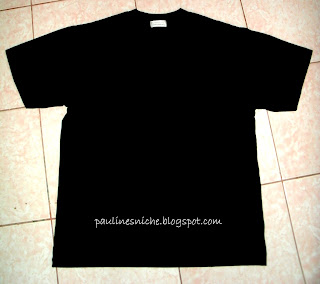
1.Get an old tshirt. Cut the bottom hem then start cutting the shirt horizontally. You can cut as many strips as you want.
2. Stretch the remaining strips until it goes long and it curls.
3. Get the bottom hem and cut the other end. Use it to knot around the strands to secure them in place.
3.Wrap the strip a few inches around the strands. Then trim the loose ends and tuck the knot underneath the fabric.
4. And viola!..your done :)
Always remember....Be positive & Be creative! :)
BRIGHTEN UP YOUR 2013 WITH EMERALD GREEN
It's great to know that every year, Pantone Color Institute chooses a color that's vibrant and fun. Having this emerald green for next year would show being one in nature. I think it's a great color everyone would love since, we can see green everywhere in our environment. I'm now excited for fashion trends next year that would utilize the color of the year which is emerald green. :)
Read more:
http://newsfeed.time.com/2012/12/10/pantone-names-emerald-as-color-of-the-year-for-2013/
DIY: RACERBACK WORKOUT SHIRT
Are you a gym enthusiast? If yes, then this is the perfect diy for you.
Recently, I have fell in love with zumba. I have been dancing for a week now and I had fun doing it every morning. However, I was a little bit uncomfortable with my workout attire. As a workout or gym lover it is important to wear the most comfortable outfit whenever you are in session. The reason for this is that having the suitable clothing helps you move easier. Thus, I decided to do this diy. So, here it is....
Materials:
Old tshirt (the bigger the better)
Scissors
1.Get your old tshirt.
2. Cut the neckline and bottom hem. Put aside the bottom hem. For the sleeves, cut downward starting from the shoulder and curve outwards down below the armpit seam. It depends on how thick you want your straps. Do the same to the other side.
3. Cut how low you want your front neckline.
4. Do the same to the back neckline, but this time make it more narrow.
5. Using the bottom hem, stretch it out until it becomes one long fabric. Knot the string a few inches above the bottom of the v-shape. Wrap the string upwards until you reach the top and make a knot. Trim the loose ends.
6. Lay your shirt sideways and cut diagonally. This will give your shirt a high-low look.
7. Done!!!
This diy was very helpful to my daily workout. I can move freely and comfortably. I hope you guys could try this too. Simple, easy and not time consuming. Actually, I have already made 3 workout shirts and I enjoyed wearing them.
Always remember....Be positive & Be creative! :)
DIY: SCALLOP SHORT
Tired of your same old boring shorts?
If your bored of using it, you can add studs or lace or you could cut some part of it to get a new look. Just like what I did with my shorts. Here's how to do it.
Materials:
Scissors, Button pin, Colored pencil
1. Place the button pin on your shorts and trace the curve or angle where you want it to be.
2. Cut the jeans following the colored mark.
3. Do the same to the other side.
....And your done! Simple, easy and creative.
If you like you could also add some studs, spikes to look it more interesting. It all depends on your own style. Always remember.... Be positive and be creative! :)
Subscribe to:
Posts (Atom)


